
Grow Tent Guide: How to Choose and Set Up a Grow Box
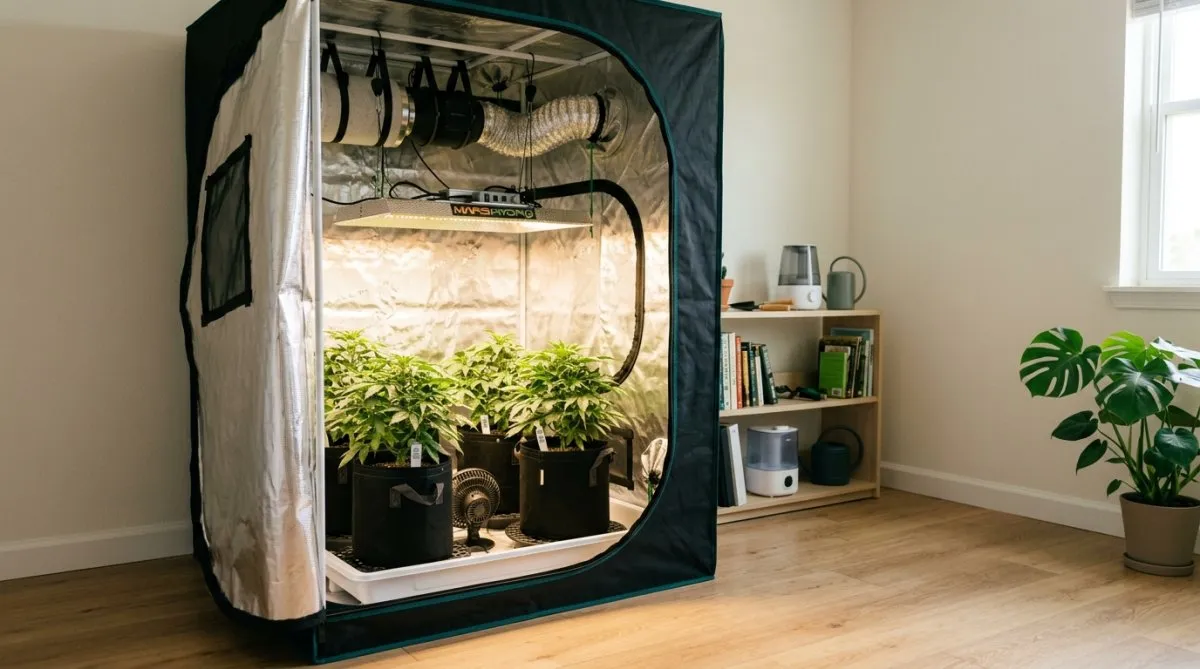
A grow box (grow tent) is a light-proof, reflective cabinet where you control light, air and temperature for your plants. For a first indoor grow, choose a tent sized to your space and plant count (60×60 cm for 1–2 plants, 120×120 cm for 4–5), an LED light matched to that footprint, and an extractor fan with a carbon filter sized to the tent's volume. Assembly takes 60–90 minutes. This guide covers both halves: choosing the right setup and assembling it step by step.
The golden rule: a grow box is a system, not a tent. Don't spend the whole budget on the light and save on everything else: the extractor, the reflective walls, the timer and the substrate all shape your harvest.
Part one: choosing your grow box
Tent, closet or room?
- Grow tent: fabric walls on a metal frame, with zipped doors and ports for ducting. Affordable, portable, available in dozens of sizes. The standard choice.
- Grow closet / cabinet: a rigid cabinet that looks like ordinary furniture. Discreet, but more expensive and harder to upgrade.
- Grow room: a whole room converted for growing. Great if you have the space: see our guide to setting up a grow room.
The quality difference between tents and closets shrinks as the price goes up: a well-made tent with dense fabric and good zips beats a cheap cabinet.
Complete kit or DIY?
For a first grow, a complete kit is the safe choice: light, fan, filter, ducting and pots are already matched to the tent size, so there are no compatibility surprises. Building your own makes sense once you know why each component is there: you save money and can pick better parts. Plan the height carefully either way — plants that outgrow the tent end up touching the lamp.
Size: match the tent to your space and plants
Tent size is a balance between your floor space, how many plants you want, and how much power you can use.
| Tent size | Plants | LED power | Best for |
|---|---|---|---|
| 60 × 60 cm (2' × 2') | 1–2 | ~150 W | First grow, discreet spaces, autoflowers |
| 90 × 90 cm (3' × 3') | 2–3 | ~250–320 W | Room for training (LST, topping) |
| 120 × 120 cm (4' × 4') | 4–5 | ~450–550 W | Several strains, hydro |
| 150 × 150 cm (5' × 5') | 6–8 | ~600–750 W | Experienced hobbyists |
Bigger is not better: a 600 W LED covers a 150×150 cm tent well. Put it in a 240×240 cm tent and the corners stay dark. Light, airflow and plant count must grow together.
Check the height too: most tents are 160–200 cm tall. Once you subtract the pot, the lamp and the 30–50 cm between lamp and canopy, a 180 cm tent leaves about 80–100 cm for the plant. Compact strains and autoflowering seeds fit best in small tents.
LED or HPS?
High-pressure sodium (HPS) lamps built indoor growing, and they still have one use: they heat. In a cold cellar, an HPS lamp warms the plants while lighting them. Everywhere else, LED wins:
- Efficiency: good horticultural LEDs deliver about 2.7–3.1 µmol/J, against about 1.7 for a good HPS. More useful light per watt.
- Running costs: at €0.25/kWh, a 150 W LED on 18 hours a day for a 9-week autoflower cycle costs about €43–48. An HPS system giving the same light costs roughly 30% more.
- Heat: much less, so climate control is easier and the lamp can hang closer to the plants.
- Lifespan: many thousands of hours, instead of a new bulb every couple of cycles.
Five things to check before you buy
- Reflective lining: mylar or similar inside, reflecting 90% or more of the light.
- Zips: the first thing to fail. Cheap zips leak light and break — try them if you can.
- Fabric: thick canvas (600D or more) blocks light, reduces noise and keeps the shape.
- Frame: solid metal poles and corner pieces that fit tightly. A wobbly frame won't carry a heavy lamp and filter.
- Ports: several sleeved openings at the top and bottom for ducting, cables and passive intake.
Part two: assembly day
Setting up a grow tent is simple: most people go from unboxing to switched on in 60–90 minutes. This order avoids most problems.
1. Assemble the frame
Build the frame on open floor first. Leave the joints slightly loose until the canvas is on: a rigid frame inside a tight cover is a wrestling match.
2. Fit the cover and put the tent in its final place
Pull the canvas over the frame and zip it up. Move the empty tent to its final position now — a full 120×120 cm tent doesn't go through doors. Check the distance to the nearest socket and to the window or wall where the exhaust will go.
3. Hang the light on adjustable hangers
Ratchet hangers are essential: you'll raise the lamp again and again as the plants grow. Start high and lower it gradually. As a guide, aim for a light intensity (PPFD) of 100–300 µmol/m²/s for seedlings, 400–600 in vegetative growth and 800–1,000 in flowering; the manufacturer's charts tell you the right height.
4. Install the ventilation: filter, fan, duct
Hang the carbon filter and the inline fan inside the tent at the top, where the heat collects: filter connected to the fan, then a duct out of the highest port. The fan pulls air through the filter, which keeps the fan clean and runs quieter. Fresh air comes in through the low vents on the opposite side; one or two small fans inside keep the air moving around the leaves.
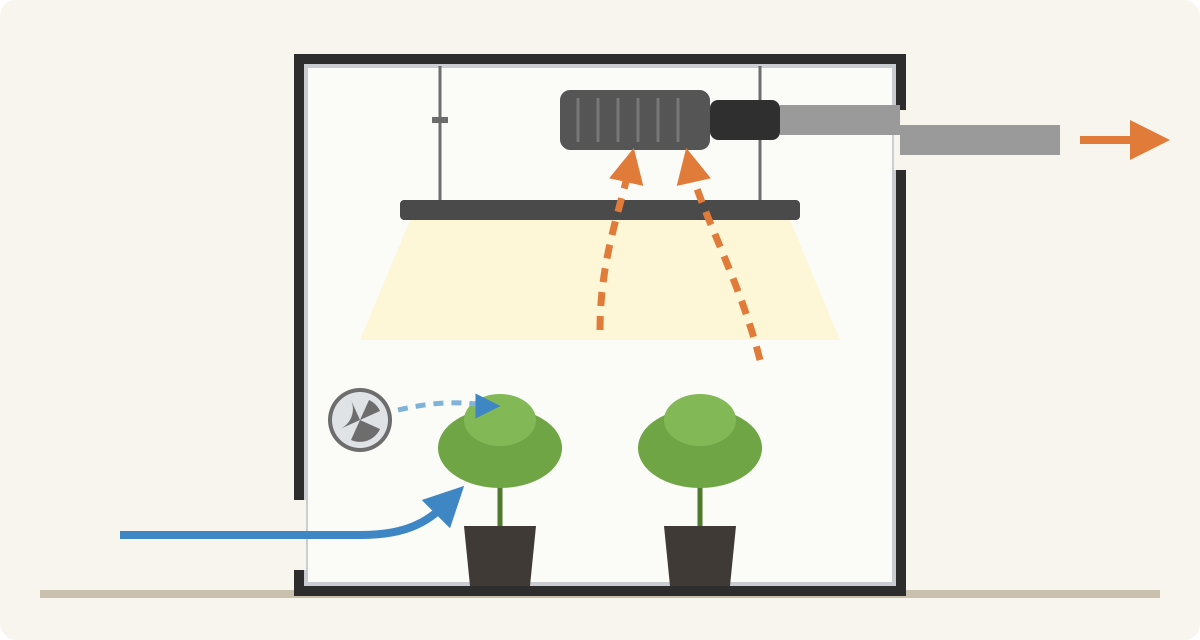
Size the fan with two minutes of maths — skipping this is how tents end up at 32 °C with drooping plants:
- Volume = length × width × height (m³).
- Base airflow = volume × 60 (one complete air change per minute), in m³/h.
- Add 25% for the carbon filter, 10–20% for each 90° bend in the duct and 20% as a margin for summer heat.
| Example: tent 120 × 120 × 200 cm | Result |
|---|---|
| Volume: 1.2 × 1.2 × 2.0 | 2.88 m³ |
| Base airflow: 2.88 × 60 | 173 m³/h |
| With filter, one bend and margin: 173 × 1.45 | about 250 m³/h (≈150 CFM) |
Keep ducts short and straight: every sharp bend loses 10–20% of the airflow, and long runs (over about 3 m) lose more. Seal every joint with aluminium tape, not ordinary duct tape, which dries out and leaks. Choose a fan with a speed controller: you can run it slower and quieter when it isn't hot.
5. Cables: keep water and electricity apart
Never leave cables on the tent floor. Route them up and out with Velcro ties or hooks, label every plug and use a good power strip with a switch, plugged into an RCD-protected socket. Put the light on a timer: 18 hours on / 6 off for vegetative growth, 12/12 for flowering photoperiod plants; autoflowers can stay on 18/6 or 20/4 from start to finish.
6. Test run with the tent empty
Before any plant goes in, run everything for 24 hours with the light on. Put a digital thermo-hygrometer with min/max memory at plant height. For vegetative growth aim for about 24 °C and 60–70% humidity. Too hot: raise the light or speed up the fan. Too cold: slow the fan down. Fix it now — plants make bad testers.
Finishing touches
- Pots: 11 L fabric pots suit most tents: they breathe, prevent circling roots and dry out at a sensible pace. Very large pots stay wet at the bottom and attract fungus gnats. Start seedlings small and transplant them later.
- Substrate: use a mix made for fast-growing plants, not generic houseplant soil. Pre-fertilized "all-mix" soils feed for weeks; "light-mix" needs feeding earlier. Read our guide to feeding seedlings.
- pH meter: a cheap tool that avoids false deficiencies. Soil: pH 6.0–6.8. Coco: 5.8–6.3. Hydro: 5.5–6.2.
- Exhaust: plan where the duct goes before you buy. Ideally outside, or into a room with good ventilation — never into a closed space.
- Smell: in flowering a good carbon filter is not optional. Cheap filters work for a cycle or two, then stop.
FAQ
What size grow tent do I need for my first grow?
A 60×60 or 80×80 cm tent is enough for 1–2 plants and easy to keep under control. If you have the space and the budget, a 100×100 or 120×120 cm tent gives more room for mistakes and training.
Do I need a carbon filter in a grow tent?
Yes, if anyone else could notice the smell. Without it, a flowering tent can be smelled from the stairs.
How far should the LED be from the plants?
It depends on the lamp: follow the manufacturer's chart. As a rough guide, 50–70 cm for seedlings and 30–45 cm in flowering for most modern LEDs.
Can I put a grow tent in a bedroom?
Yes, if you can handle the noise of the fans and the duct can go out of a window or into a ventilated space. Check the temperature in summer: a bedroom tent can overheat on hot days.
The box doesn't grow the plants
A €500 tent won't save a grower who forgets to water, and modest tents have produced excellent harvests in careful hands. The equipment sets the ceiling; your daily attention does the rest. When the tent passes its test run, it's time to germinate your seeds.
Legal note: growing cannabis is regulated differently in each country. Check and respect the law where you live.