Setup Guides

Indoor

Room Setup

Beginner 5 min read

Introduction

Setting up a proper grow room is the foundation of every successful indoor cannabis cultivation. Whether you're converting a spare bedroom, a basement, or a dedicated space, getting the room right from the start will save you time, money, and headaches down the line. In this guide, we'll walk you through every key element of a professional grow room setup.

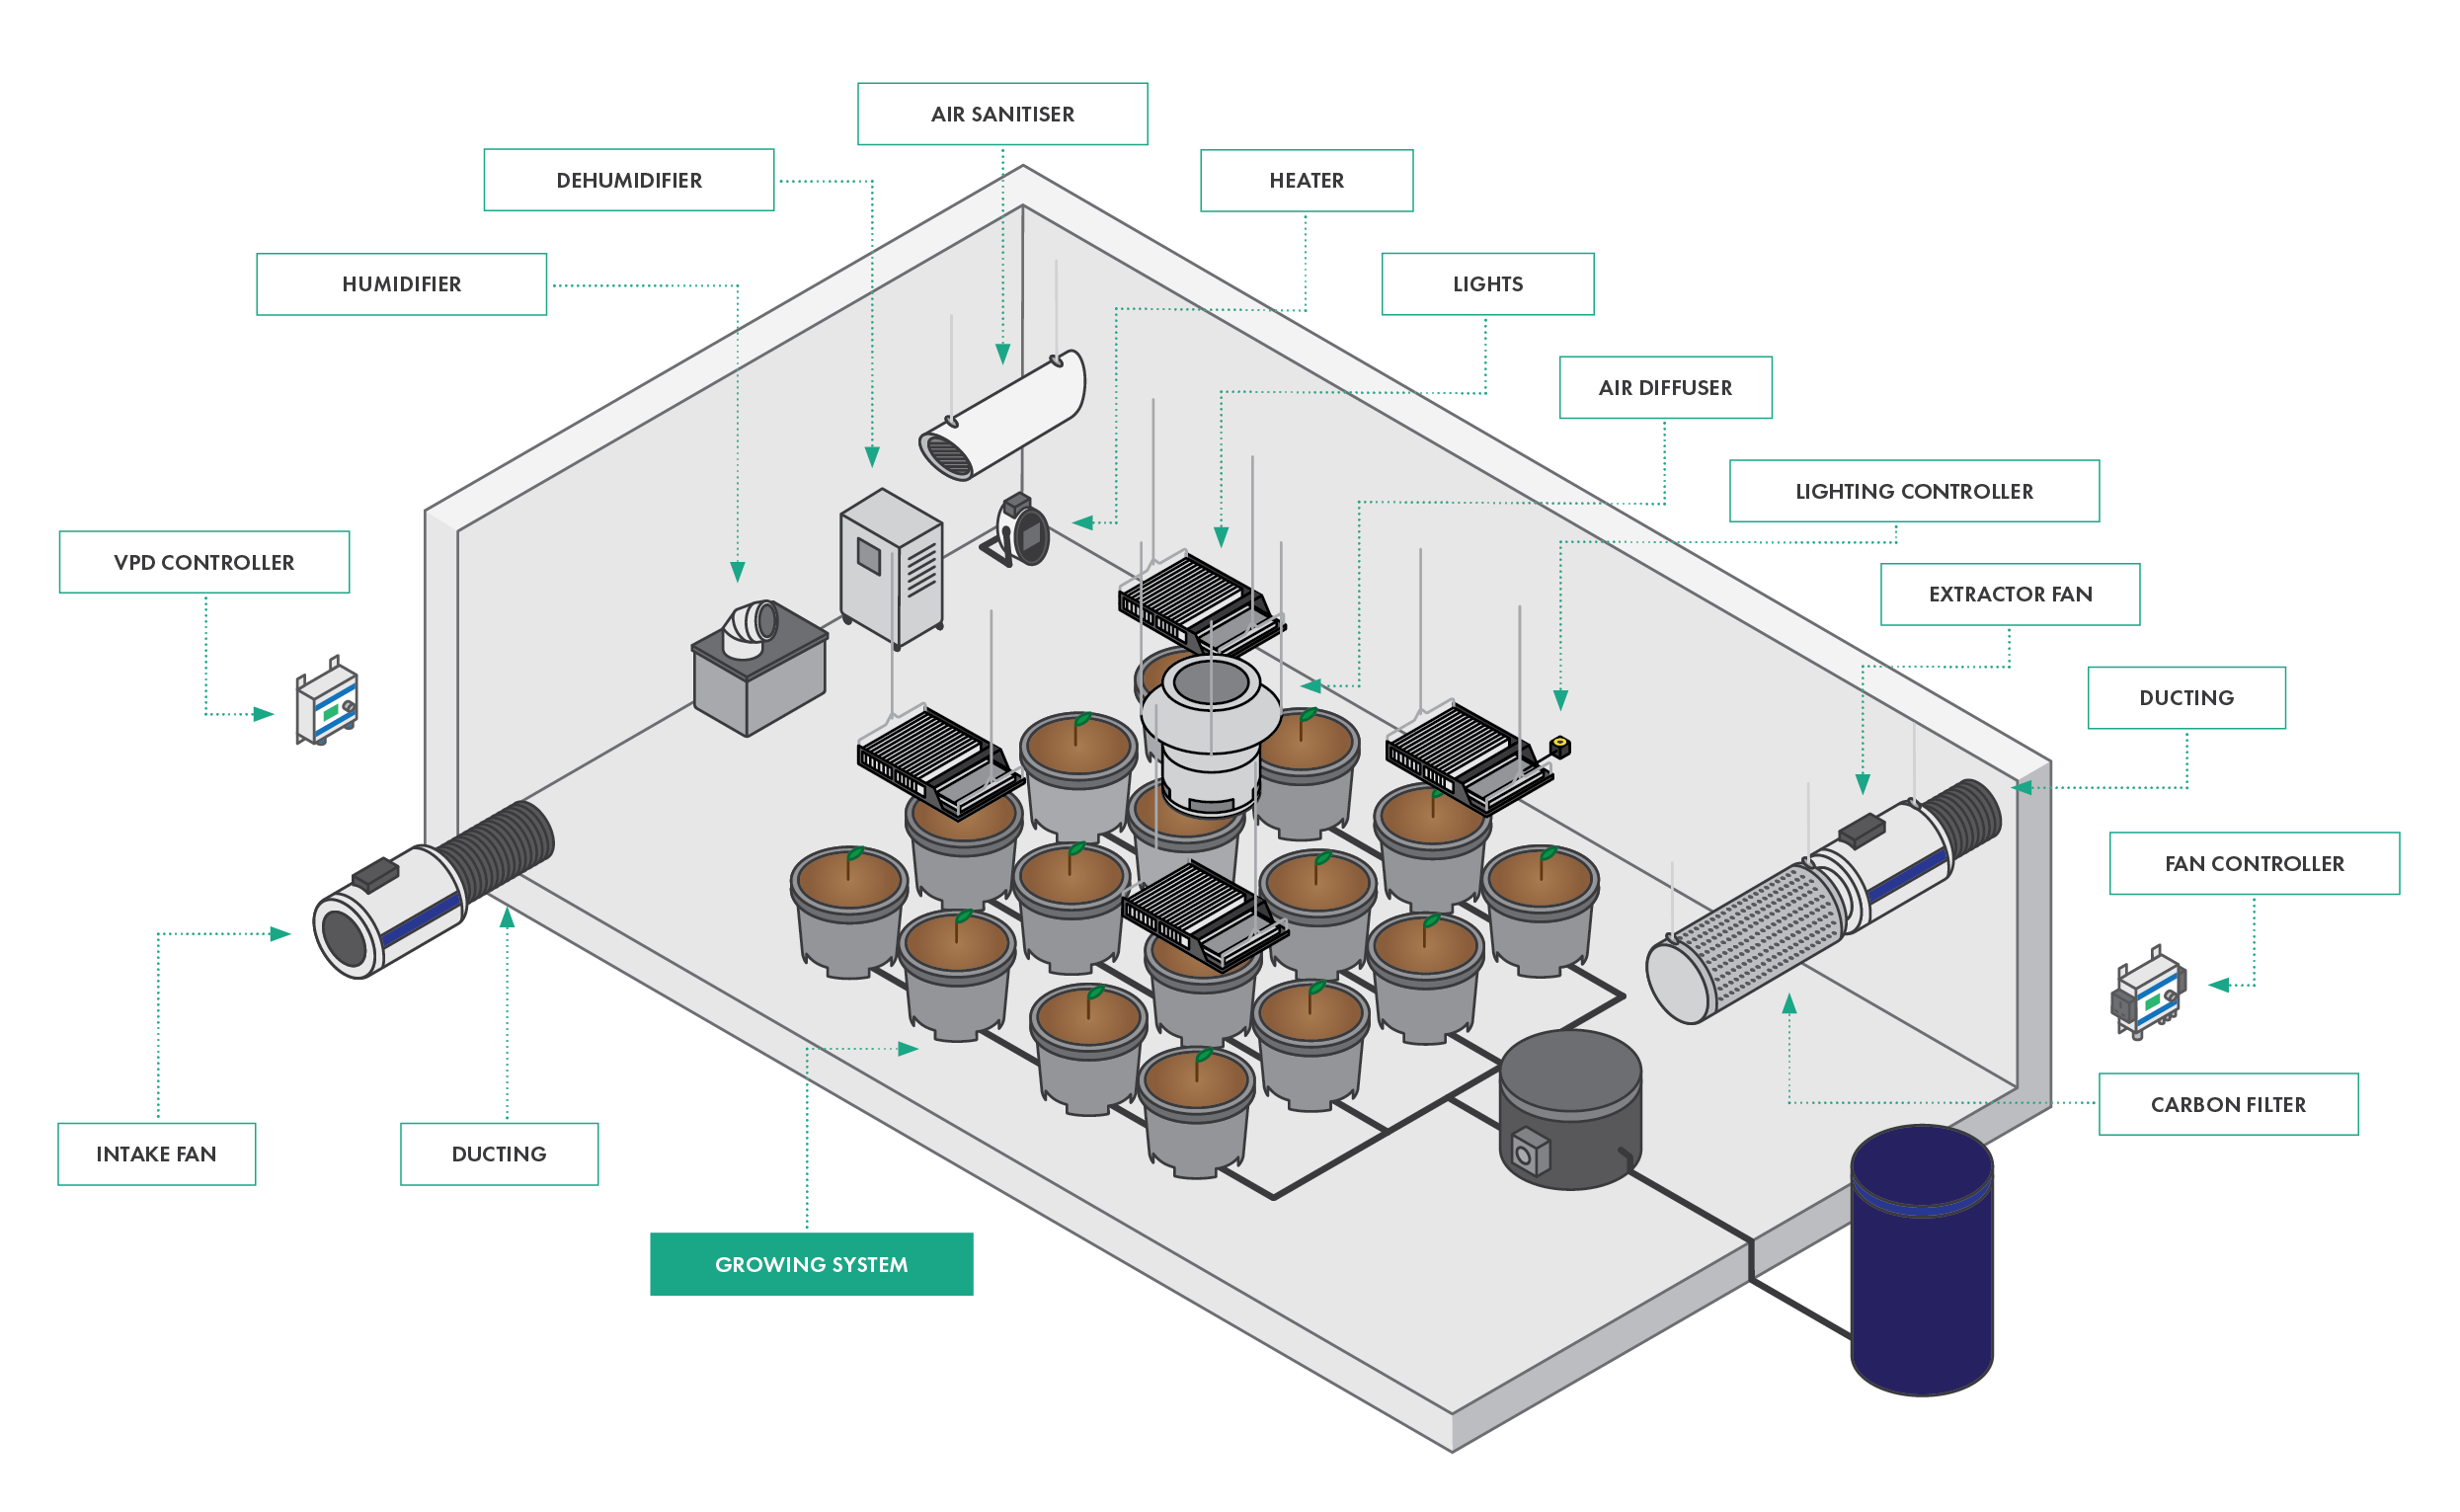
Overview of a complete indoor cannabis grow room

Choosing the Right Space

The first step is selecting the right room. Ideally, you want a space that is:

  • Light-proof: No light leaks during the dark cycle. Even a small crack can stress your plants and trigger hermaphroditism.
  • Temperature-stable: Avoid rooms exposed to extreme heat or cold, like attics in summer or uninsulated garages in winter.
  • Accessible to water and drainage: Proximity to a water source reduces daily labor significantly.
  • Electrically adequate: Grow rooms draw significant power. Make sure your circuit can handle the load before installing anything.

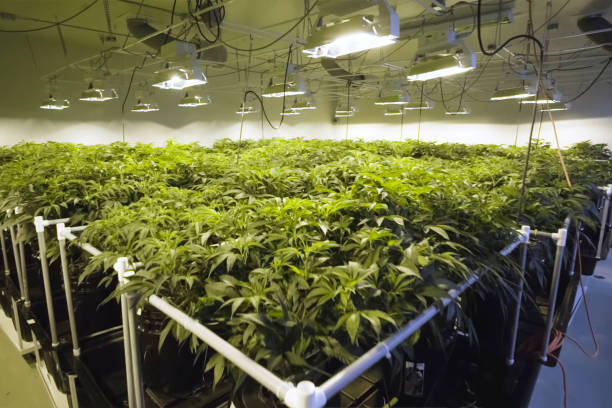
Selecting the ideal room for cannabis cultivation

Sealing and Light-Proofing the Room

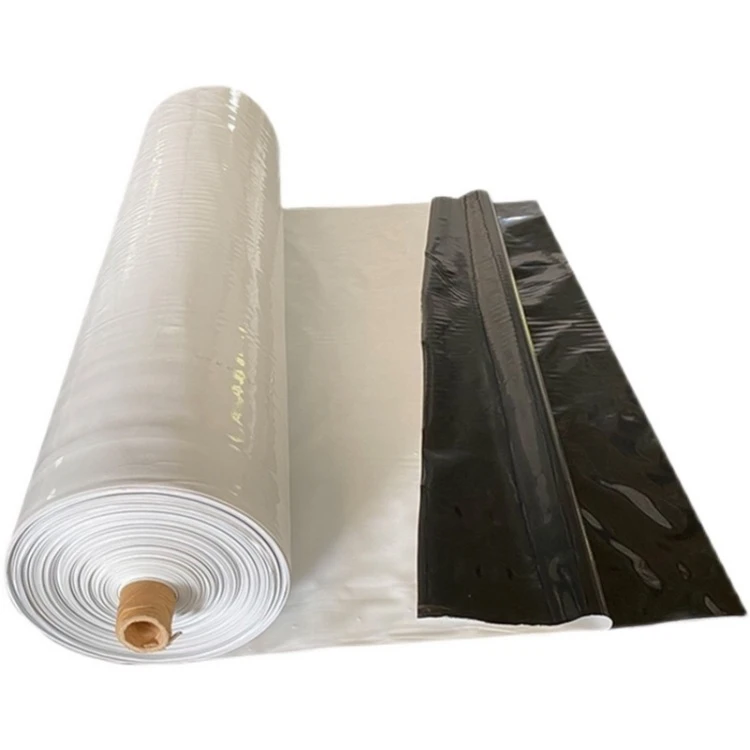
Before anything else, seal the room completely. Use black and white poly sheeting (mylar or panda film) to line walls, floor, and ceiling. The white side reflects light back onto the canopy, maximizing efficiency, while the black side prevents light from escaping or entering.

Check for leaks by turning off all lights inside and standing in the dark for a few minutes. Any light you see needs to be sealed with light-proof tape or foam strips.

Panda film lining the walls of a grow room

Insulation and Temperature Management

A well-insulated room holds temperature more consistently, reducing the load on your climate control equipment. Rigid foam insulation panels are an excellent choice — they're lightweight, effective, and easy to cut to size.

Cannabis thrives at:

  • Vegetative stage: 22–28°C (72–82°F)
  • Flowering stage: 18–26°C (65–78°F)
  • Lights off: no more than 10°C drop from lights-on temperature

Room Layout and Zoning

A well-planned layout separates different functional areas of the grow room. Consider dividing your space into zones:

  • Canopy zone: where your plants live. Keep it clean, organized, and accessible from all sides if possible.
  • Equipment zone: where your fans, filters, reservoirs, and control panels are housed. Keeping equipment off the floor reduces humidity-related issues.
  • Work zone: a clear space where you can work comfortably — trimming, transplanting, inspecting plants.

Grow room layout with labeled zones for canopy, equipment, and work area

Flooring

Hard, waterproof flooring is essential. Concrete is ideal. If your floor is carpeted or wooden, cover it with a waterproof liner or heavy-duty plastic sheeting before adding a raised flooring system. Standing water on organic surfaces leads to mold, pests, and structural damage.

Consider adding a slight slope toward a drain point if possible, especially for larger rooms where spills are inevitable.

Electrical Setup

Calculate your total wattage before plugging anything in. A standard 20A circuit at 220V supports up to 4,400W — but you should never run a circuit above 80% capacity, so plan for a maximum of around 3,500W per circuit.

  • Use heavy-duty power strips with surge protection.
  • Keep all cables off the floor and away from water.
  • Install a dedicated circuit if your setup exceeds 2,000W.
  • Consider a timer panel or smart controller to automate lighting and equipment schedules.

Electrical panel and wiring in a grow room setup

Water Supply and Drainage

Having a dedicated water line in or near the grow room dramatically simplifies daily operations. At minimum, ensure you have:

  • A nearby tap or water reservoir of sufficient volume.
  • A drain or a way to remove runoff water (wet-dry vacuum, sump pump, or a floor drain).
  • pH and EC meters always within reach.

For larger operations, consider installing an inline filter to remove chlorine and sediment before water reaches your plants.

Stealth and Security Considerations

Depending on your location and local regulations, you may want to consider odor control beyond the grow room itself, as well as physical security. Carbon filters connected to your exhaust system are the most effective odor solution. For security, a simple padlock on the door is often sufficient for home growers.

Final Checklist Before You Start Growing

  • ✅ Room is 100% light-proof
  • ✅ Walls lined with reflective material
  • ✅ Electrical circuits checked and labeled
  • ✅ Waterproof flooring in place
  • ✅ Water source and drainage sorted
  • ✅ Temperature and humidity baseline measured
  • ✅ Equipment zones clearly defined

Final checklist for a complete grow room setup

Once all these elements are in place, you're ready to move on to the specific equipment that will go inside your grow room — lighting, ventilation, climate control, and more. A solid room setup is the infrastructure everything else builds on.


Growbox

Beginner 5 min read
Complete Guide 2026

The Grow Box Bible

How to buy the right grow box, assemble it without losing your sanity, and build an indoor cannabis garden your plants will brag about.

Imagine a garden that never rains on your parade. No surprise frosts, no aphid invasions from the neighbour's roses, no biting wind arriving right on cue during flowering week six. Just you, your plants, and a perfectly tuned microclimate humming quietly in the corner of your home.

That's the promise of a grow box. And unlike most promises, this one actually delivers — provided you don't buy the wrong one and wire it up while half-watching a YouTube tutorial at 2 a.m. This guide walks you through both halves of the journey: choosing your setup like a seasoned buyer, and assembling it like someone who has done this a hundred times (because, frankly, the collective experience of two decades of indoor growers is baked into everything below).

[ IMAGE 1: Hero shot of a fully assembled grow tent with the door open, LED light glowing, healthy plants inside — aspect ratio 16:9 ]

Part One: Choosing Your Grow Box

First, a vocabulary lesson that saves money

Walk into any grow shop and you'll meet three cousins: the grow box, the grow tent, and the grow closet. They get used interchangeably, but they aren't the same animal.

  • Grow tent: A fabric cabinet with a metal pole skeleton and zippered doors. Portable, affordable, and available in dozens of sizes. The industry workhorse.
  • Grow closet: A rigid, furniture-grade cabinet that looks like an ordinary wardrobe from the outside. Stealthy and handsome, but heavier on the wallet.
  • Grow room: An entire room converted to cultivation. Fantastic — if you happen to own a spare room and a forgiving electricity bill.

The general rule: quality differences between tents and closets shrink as price goes up. A premium tent with proper zippers and dense fabric will outperform a cheap "closet" made of glorified cardboard. Which brings us to the most important sentence in this guide: a grow box is a system, not a tent.

The Ferrari Rule: Never blow your entire budget on the light and treat everything else as an afterthought. A 600W lamp in a flimsy tent with a £15 fan is a Ferrari you can't insure. The extractor, the reflective walls, the timer, the substrate — they're all co-authors of your final harvest.

Kit or DIY?

If this is your first grow, buy a complete kit. Seriously. A curated kit bundles components that are already proven to work together: the right light for the footprint, a fan matched to the volume, pots that actually fit, and cables that reach. Every compatibility headache has been solved for you, usually by someone who made the mistake the hard way first.

Going DIY makes sense once you know why each component exists. You'll save some money and gain full customization — and if you map your equipment before building the box, you'll avoid the classic rookie heartbreak: plants outgrowing their home and kissing a 250W bulb mid-stretch.

[ IMAGE 2: Side-by-side comparison — flat-lay of a complete grow tent kit contents vs. a DIY parts shopping list — aspect ratio 3:2 ]

Sizing: match the tent to your ambitions

Tent size is a three-way negotiation between your floor space, your plant count, and your power supply. Here's the cheat sheet:

Tent size Plants LED power Best for
60 × 60 cm (2' × 2') 1–2 ~150 W First grow, stealth, autos
90 × 90 cm (3' × 3') 2–3 ~320 W Room for training (LST, topping)
120 × 120 cm (4' × 4') 4–5 ~450 W Multi-strain grows, hydro
150 × 150 cm (5' × 5') 6–8 ~600 W Serious hobbyists
More tent ≠ more bud. A 600W LED perfectly covers 150×150 cm. Park it in a 240×240 cm tent and you've just built an expensive tanning booth. Every element — light, airflow, plant count — must scale together.

LED vs. HPS in 2026: the debate is over

High-pressure sodium (HPS) lights built the indoor cannabis industry, and they still have one niche: they double as heaters. If your grow space is a cold cellar, an HPS setup warms the canopy while it feeds it — sometimes eliminating the need for a separate heater.

Everywhere else, LED wins outright:

  • Efficiency: quality horticultural LEDs deliver roughly 2.7–3.1 µmol/J versus ~1.7 for a good HPS bulb. Translation: more usable photons per watt.
  • Running costs: at €0.25/kWh, a 150W LED costs about €43–48 per full autoflower cycle (~9 weeks) — roughly €10–15 a month. An equivalent HPS system (lamp plus electromagnetic ballast) runs ~30% higher, landing around €55–62 per cycle.
  • Heat: less heat means easier climate control and lights you can hang closer to the canopy.
  • Lifespan: thousands of hours before meaningful degradation, versus a bulb swap every couple of cycles.
[ IMAGE 3: Infographic comparing LED vs HPS — energy draw, heat output, spectrum bars — aspect ratio 16:9 ]

Inspect before you buy: the five-point quality check

  • Reflectivity: inner walls should be Mylar or equivalent, reflecting 90%+ of light (premium diamond Mylar hits ~94%). Anything less is burning money photon by photon.
  • Zippers: the #1 failure point. Cheap zippers leak light and eventually fail — open and close one in person if you can.
  • Fabric density: thicker canvas (look for 600D or more) blocks light, dampens noise, and holds the frame rigid.
  • Frame: sturdy, powder-coated poles with properly fitting corner connectors. Shake the assembled demo — if it wobbles, walk away.
  • Vent ports: multiple, properly placed sleeve openings for ducting, cables, and passive intake.

Part Two: Assembly Day

You've got the box, the light, the fan, and a free afternoon. Good news: setting up a grow tent is genuinely simple — most people go from unboxing to powered-on in 60–90 minutes. Here's the smoothest sequence, refined over hundreds of real builds.

1

Assemble the frame outside the tent

Build the pole skeleton first, on open floor. Snap the corners in, and — this is the pro move — leave it slightly loose until the canvas is on. A rigid frame plus a tight sleeve equals a wrestling match you don't need.

2

Dress the frame and place the tent before filling it

Pull the canvas over the top and zip it down. Position the empty tent in its final spot now — a loaded 120×120 cm tent does not enjoy being dragged through doorways. While it's empty, note the distance to your nearest window (for exhaust) and power outlet.

3

Hang the light with adjustable ratchet hangers

Rope ratchets are non-negotiable — you'll be raising and lowering the lamp constantly as plants stretch. Start high; you can always bring it down. Aim for these PPFD targets as a baseline: 100–300 µmol/m²/s for seedlings, 400–600 in veg, 800–1000 in flower.

4

Install ventilation: filter → fan → ducting

The golden configuration hangs everything inside the tent at the top, where heat pools: carbon filter attached directly to the inline fan, then ducting out through the highest vent port. Pulling air through the filter (rather than pushing) keeps dust out of the fan and runs quieter.

Size the fan with two minutes of math — skipping this is how tents end up at 32 °C with drooping plants:

VOLUME = Length × Width × Height (m³)
BASE FLOW = Volume × 60 (one full air change per minute, m³/h)
+ 25% for the carbon filter
+ ~10–20% per 90° bend in ducting
+ 20% buffer for summer heat

EXAMPLE — 120×120×200 cm tent:
2.88 m³ × 60 = 173 m³/h base
173 × 1.45 ≈ 250 m³/h minimum fan rating (≈ 150 CFM)

Keep ducting runs short and straight — every sharp bend steals 10–20% of your airflow, and runs beyond ~3 metres bleed off even more. Seal every joint with aluminium foil tape, not duct tape (which dries out and leaks). Add one or two small oscillating fans inside to keep air moving across the canopy: stagnant, humid pockets are where mould writes its love letters.

[ IMAGE 4: Diagram of ventilation layout — carbon filter, inline fan and ducting hanging at the top of the tent, arrows showing airflow — aspect ratio 3:4 ]
5

Cable management: treat water and electricity like exes

Never let cables rest on the tent floor. Use Velcro ties or hooks to route them up and out, label every plug, and plug everything into a surge-protected power strip. Your lights on a timer (18/6 for veg, 12/12 for flowering photoperiods; autos happily run 18/6 or 20/4 all the way through).

6

The empty-tent test run

Before a single seed goes in, run the tent for 24 hours with the lights on. Grab a digital thermo-hygrometer (€13–15, the best money you'll spend) and check the readings at canopy height: you're aiming for ~24 °C and 60–70% humidity in veg. If temps run hot, raise the light or up the fan speed; if they run cold, you may have sized the extraction too aggressively. Fix it now — plants make terrible beta testers.

The finishing touches that separate amateurs from artists

  • Pots: 11-litre fabric (geotextile) pots are the sweet spot for most tents — they breathe, prevent root spiralling, and dry at a sensible pace. Avoid giant 25L+ containers: the soggy substrate underneath becomes a fungus-gnat nursery.
  • Substrate: use a medium designed for fast-draining crops, not generic houseplant soil. "All-mix" soils are pre-fertilized; "light-mix" needs earlier feeding. Match your nutrient schedule to whichever you choose.
  • pH pen: a €20 tool that prevents fake deficiencies and over-fertilization disasters. Soil wants 6.0–7.0; hydro wants 5.5–6.0.
  • Exhaust window distance: plan this before buying. Ducting longer than 3–4 metres will punish your airflow, and the exhaust must terminate outside — not into the room the tent sits in.
  • Odour: a quality carbon filter isn't optional in flower. Budget-grade filters work for a cycle or two, then become decorative.
[ IMAGE 5: Lifestyle shot — person checking a digital thermo-hygrometer at canopy level inside a lush flowering tent — aspect ratio 4:3 ]

Final thought: the box doesn't grow the plants

Here's the uncomfortable truth every honest grower eventually learns: a €500 tent won't rescue a grower who forgets to water, and a €200 tent has produced trophy harvests in careful hands. The equipment sets the ceiling — your daily attention sets the floor. Watch the leaves, respect the pH, keep the air moving, and the machine you've just built will do the heavy lifting.

Now close this guide, zip up your tent, and go meet your plants. They're waiting.

The Grow Box Bible — a complete guide to buying & assembling your indoor cannabis setup.

Grow responsibly. Always check and comply with the cannabis cultivation laws in your country or region.


CO2

Beginner 5 min read

CO2

This is a placeholder content for CO2.


Soil

Beginner 5 min read

Soil

This is a placeholder content for Soil.


Fertilization (Indoor)

Beginner 5 min read

Fertilization (Indoor)

This is a placeholder content for Fertilization (Indoor).


Watering (Indoor)

Beginner 5 min read

Watering (Indoor)

This is a placeholder content for Watering (Indoor).


Hydroponic (Indoor)

Beginner 5 min read

Hydroponic (Indoor)

This is a placeholder content for Hydroponic (Indoor).


Ventilation Systems

Intermediate 8 min read

Introduction to Ventilation

A proper ventilation system is essential for indoor growing. It removes stale air, controls temperature and humidity, and provides fresh CO2 for your plants.

Key Components

  • Extraction Fans - Remove hot air from the grow room
  • Intake Systems - Bring fresh air into the room
  • Circulation Fans - Move air around the canopy
  • Carbon Filters - Reduce odor and improve air quality

Best Practices

Maintain negative pressure in your grow room. This means the extraction fan should pull out more air than is coming in. This creates negative pressure and helps with odor control.


Indoor Lighting Guide

Beginner 10 min read

Types of Grow Lights

Choosing the right light for your grow room is crucial for plant development and yield.

LED Lights

LED lights are energy-efficient and produce less heat than traditional HPS bulbs. They are ideal for small to medium grow operations.

HPS (High Pressure Sodium)

HPS lights are great for flowering stages. They emit more red spectrum light which encourages flowering and budding.

Light Cycles

Vegetative stage: 18 hours light, 6 hours dark. Flowering stage: 12 hours light, 12 hours dark.


Temperature and Humidity Management

Intermediate 7 min read

Understanding VPD

Vapor Pressure Deficit (VPD) is the difference between the amount of moisture in the air and how much moisture the air can hold when it is saturated.

Optimal Ranges

  • Seedling: 65-70┬░F (18-21┬░C), 65-75% humidity
  • Vegetative: 70-78┬░F (21-26┬░C), 40-60% humidity
  • Flowering: 65-75┬░F (18-24┬░C), 40-50% humidity

Tools You Need

A good thermometer-hygrometer combo and possibly a dehumidifier or humidifier depending on your climate.


Outdoor

Environment / Location

Beginner 5 min read

Environment / Location

This is a placeholder content for Environment / Location.


Pot

Beginner 5 min read

Pot

This is a placeholder content for Pot.


Light (Outdoor)

Beginner 5 min read

Light (Outdoor)

This is a placeholder content for Light (Outdoor).


Watering (Outdoor)

Beginner 5 min read

Watering (Outdoor)

This is a placeholder content for Watering (Outdoor).


Fertilization (Outdoor)

Beginner 5 min read

Fertilization (Outdoor)

This is a placeholder content for Fertilization (Outdoor).


Pests & Protection

Beginner 5 min read

Pests & Protection

This is a placeholder content for Pests & Protection.


Aquaponic

Beginner 5 min read

Aquaponic

This is a placeholder content for Aquaponic.


Hydroponic (Outdoor)

Beginner 5 min read

Hydroponic (Outdoor)

This is a placeholder content for Hydroponic (Outdoor).


Guerrilla Growing: Stealth and Safety

Intermediate 12 min read

Guerrilla Cannabis Growing: What Actually Decides the Outcome

Most guerrilla patches don't fail because of the genetics. They fail because nobody corrects anything: no one spots the first mite colony, fixes a nutrient lockout, or ties a plant down before a storm. The losses that repeat are mundane. The soil pocket turns into a bathtub, the water runs out in the second week of August, roe deer browse the tops in May, and a mushroom picker follows a bright green plant off the path in October. This article covers those failure points in the order you meet them.

Legal reality. Unlicensed outdoor cultivation is an offence in Italy and most of Europe, or at best a grey area that depends on quantity, intent and how a court reads the case. On land you don't own it adds trespass, and in protected areas or forests it can add environmental offences. This article describes technique and changes none of that.

Genetics and calendar: fix the constraints first

Everything downstream depends on when the plant finishes, so settle that before choosing a site.

  • Photoperiod cultivars flower as nights lengthen, so genetics and latitude set the finish date. At 42–46°N you want something that reliably finishes between the last week of September and mid-October. A sativa-leaning plant that needs 11–12 weeks of flower will still be wet in November. Look for 8–9 weeks of flower, an open bud structure and documented mold tolerance. Dense, golf-ball indica buds are the ones that rot in a wet October.
  • Autoflowers flower with age, not with light. The claim that they "need less light" is wrong. Sown from late May to June, they finish between mid-August and mid-September, ahead of the worst autumn weather and most of the hunting season. The costs are size (often 20–80 g dry per plant outdoors) and poor tolerance of root disturbance, so start them in their final container or transplant within two weeks of germination. Their small stature is their main advantage for concealment.
  • Seeds versus clones. Seed-grown plants develop a taproot. Clones tend to have a shallower, more fibrous root system, which matters when nobody waters for a week. If you start plants at home, aim for 3–4 weeks and 20–30 cm before moving them. Harden them off for 5–7 days, increasing sun and wind gradually, or the first week outdoors will burn and stunt them.

1. Site selection: light, cover, access and air

Light. Flowering plants want at least 8 hours of direct sun, and 10 is better. Judge the site with the canopy it will have in July, not the one you see in March. Oaks, chestnuts and beeches leaf out in late April and May and can close a gap you judged sunny. South to south-east exposure matters mostly because morning sun dries dew, and wet buds at 8 a.m. in October are how bud rot starts.

Terrain. Mid-slope beats both ridge and hollow. Hollows collect cold, humid air (late frosts in spring, saturated air in autumn) and valley floors flood. Ridges dry out and take the wind. Abandoned terraces, old clear-cuts, gaps in coppice, post-fire regrowth and the edges of abandoned fields tend to combine light, existing scrub and few visitors.

Soil. Dig a test pit before committing. Check for earthworms, root depth, texture and drainage, and measure pH. Much of Italy sits on calcareous soil above pH 7.5, where iron, manganese and zinc become unavailable and plants show interveinal yellowing however much you feed them. Amended planting pockets help but bring their own failure mode. A 50–60 L pocket of good substrate in heavy clay behaves like a flowerpot without drainage holes: water pools and roots suffocate. Dig wide rather than deep, rough up the walls of the hole, and blend the backfill roughly half and half with native soil so water can move outward. Nettles indicate nitrogen-rich, disturbed soil. That is a useful clue about fertility, not evidence of drainage.

Concealment. Think in three sightlines:

  • From the ground. Check from every path at eye height (about 1.6 m), in both directions, and again once the leaves have fallen.
  • From above. In a dry Mediterranean summer, cannabis is a saturated green against yellow grass. In autumn it stays green after the surroundings have turned. That contrast is what shows up in aerial images and drone footage. Placing plants under the edge of a tree crown or inside bramble breaks both outline and colour.
  • By scent. No companion plant masks cannabis. Lavender or rosemary does not survive contact with a still August evening, when flowering plants can be smelled from tens of metres. What works is geometry: plant so that the prevailing wind and the evening downslope air carry odour away from the nearest path, not toward it.

Plant architecture. Top early (at the fourth or fifth node) and train branches sideways to stay below about 1.5 m. Tie back surrounding vegetation instead of cutting it, because fresh cuts and broken ends stay pale and visible for years. Avoid rows and even spacing. Use irregular groups of one to three plants in separate pockets several metres apart.

Access. The useful distance is a middle one: 100 m or more from any path, over terrain that is unpleasant to cross (brambles, steep, wet) but that you can walk in 15–25 minutes while carrying 20 kg. Use the tools other people use to find quiet ground: satellite imagery from different dates, OpenStreetMap tracks, the Strava global heatmap, which shows where people really walk, and regional forestry and hunting-reserve maps. A forest scheduled for felling is a bad site however good the soil is.

Split the plants. Three sites with two plants each survive a single loss better than one site with six. Each site also draws less attention and caps the water you have to haul.

2. Water: plan the budget before the plant count

Water decides how often you visit, and visits are your main exposure. Estimates for fully irrigated large outdoor plants run from roughly 6 L to over 20 L per day at peak, but those figures describe ideal irrigation. A deep-rooted plant in mulched soil that is soaked thoroughly and rarely needs far less. A workable pattern is 20–30 L per plant per visit, every 7–10 days in peak heat and every 10–14 days earlier. Add one or two extra visits in the first fortnight after transplanting, before the roots have left the original plug. Leaves that droop in mid-afternoon and recover overnight are normal. Leaves still drooping at dawn need water.

Do the arithmetic. Six plants at 25 L is 150 L, or seven to eight loads of 20 kg. Three plants is about four loads. Every plant you add costs you carrying capacity.

Sources. Springs, seeps and small streams are the obvious answer. They are also where boar wallow, foragers walk, anglers go, and where land is most likely to be protected. A better pattern is to plant on the slope 50–150 m above the water, outside the riparian corridor, and carry water uphill in collapsible 10–20 L bladders. Don't build visible hoses, dams or pools. Taking water may itself be regulated, and damming or diverting it harms downstream habitat.

Mulch. Apply 8–10 cm of leaf litter, straw or chipped brush, kept a few centimetres back from the stem to avoid collar rot and rodent nests. Mulch cuts surface evaporation substantially and moderates root temperature. For its cost, it does more than any gadget.

Hydrogel. Cross-linked potassium polyacrylate is oversold. The crystals absorb hundreds of times their weight in distilled water but far less in salty soil water. The benefit is real in sandy or stony soil and close to nothing in clay. Mixed into the planting pocket at the manufacturer's rate (usually a few grams of granules per litre of substrate, pre-hydrated), it buys a few extra days at best. Overdosing gives a swollen, unstable, permanently sodden pocket. It degrades slowly and leaves polymer residue in the soil. Coco coir, compost and biochar give comparable buffering without that residue. Treat any of them as a buffer, never a substitute for deep watering.

Ollas and buried reservoirs. An unglazed terracotta pot buried to its neck, filled and capped, releases water into the surrounding soil roughly in proportion to how dry it is. A 3–5 L olla per plant noticeably stretches the interval, and a buried perforated bottle or a bucket with a wick works on the same principle. Cover every opening with bark or a stone, because orange clay and clear plastic show from above. Gravity drips from a bag or bucket work too, but they are more conspicuous, grow algae and clog on silty water.

Visit design. Make each visit a fixed 20–30 minute routine: water, check leaf undersides for mites, check stakes and cages, leave. Time visits to the forecast. Skipping the trip after a real soaking rain, and going just before a heat wave, is worth more than any hardware.

3. Security and logistics: how patches actually get found

The people who find patches are rarely looking for cannabis. They are hunters, mushroom and chestnut foragers, truffle hunters with dogs, forestry crews, and walkers who leave the path for a private moment. Theft by whoever stumbles on a patch is more common than a deliberate search. Watch also for camera traps and bait stations. Hunters set them along boar routes, and they record anyone who passes, including you.

Traces on the ground. A patch is given away less by the plants than by the way you arrive.

  • Vary your approach. Cross the last 50–100 m over leaf litter, stone and existing game trails, never over mud, sand or soft moss where a boot print stays for weeks. Don't push through brambles to make a new gap.
  • Use a single standing spot at each plant and water from it.
  • Carry everything out. Leave no tape, flagging, bright ties or plastic sheeting. Use natural fibre for ties and organic mulch, since black fabric shows from above.
  • Don't cut trees or large branches for light. Bend and tie instead.
  • Navigate by offline map and natural landmarks, not markers.

Timing. Dawn and dusk belong to hunters, foragers and dog walkers. Autumn boar drives with dogs are common from October to January in many Italian regions, so check your regional calendar. A headlamp at night draws attention. Mid-morning on a weekday, dressed and equipped like a walker, is the least conspicuous window for most of the year. Avoid public holidays, the weekends after September–October rain when mushrooms flush, the first days of hunting season, and any period of scheduled forestry work. During drives the woods are dangerous in their own right: a person in camouflage off the path is invisible to a hunter, so skip those days.

Vehicle and phone. Park where cars ordinarily park, such as a trailhead or picnic area, and not on the same verge every time. A car seen repeatedly at the end of a forest track at odd hours is a common reason patches get reported. Your phone keeps a log. Geotagged photos, location history and coordinates sent in chat apps are persistent records, so switch off geotagging and don't photograph the site.

People. Go alone or with one partner. Talk is the leak behind most compromised patches.

Contingency. Decide in advance. If you meet someone near the site, you are a walker and you keep walking. If you find a trampled approach, cut or missing plants, a camera or flagging tape, leave without lingering and treat the site as burned. Clear your material when you can do so safely.

Rules that protect the place and you.

  • Use no rodenticides or broad-spectrum pesticides. Anticoagulant rodenticides and carbamates from illegal grows have poisoned foxes, owls and other wildlife through the food chain.
  • Never set traps or booby traps for people or animals.
  • Don't smoke or make fire on site in the dry season, and don't leave plastic behind.
  • Expect ticks, vipers and heat, and carry water for yourself.

4. Wildlife and pests

Ungulates and rodents. Roe deer browse tender growth, and young cannabis is commonly taken. The vulnerable window runs from transplant until the plant is about 40–50 cm tall, roughly April to June. In spring bucks also thrash stems and saplings with their antlers, which can snap a plant. Hares and rabbits take seedlings at ground level, voles gnaw stems and roots under the mulch, and porcupines, where present, dig and gnaw. Slugs can clear seedlings overnight in damp weather.

Wild boar are the hard case. They root for earthworms, tubers and larvae, and a freshly dug pocket of compost and amended soil smells like an ideal spot. Bone meal, blood meal, fish emulsion and other animal-derived fertilisers add to the attraction, so leave them out. Boar also use water sources and wallows at night, so your "site near the stream" and their route often coincide. Before committing, walk the area for tracks, rooting, wallows, rubbing trees and droppings. Adjacent maize or vineyards raise the odds.

Mechanical protection. Individual cages beat perimeter fences.

  • Use a cylinder of welded mesh (5×5 to 10×10 cm openings, 3–4 mm wire), 60–80 cm across and 1.5–1.8 m tall, staked with hazel poles or rebar. Put it up on transplant day.
  • It protects against roe deer and hares, breaks up the plant's outline, and looks less like a plot than a fence line does. Choose matte green or brown mesh and cover it with brush.
  • For seedlings and voles, wrap the base in 6–13 mm hardware cloth buried 5–10 cm.
  • Against boar, light mesh is not enough. Heavy welded mesh (4–5 mm wire or thicker) staked deeply, or electric wire (two strands at about 20 and 40 cm) on a solar energiser, does work. Both are visible and say that someone tends the place. In practice you avoid boar mainly through site choice and accept that a fence strong enough to stop them announces the patch.

Repellents. Predator urine, human hair, soap and chilli give mixed results. Rain washes them off and animals habituate to them, so treat them as a supplement at most.

Insects and disease. What matters depends on climate, but a few dominate outdoors in central and southern Europe:

  • Caterpillars (corn earworm Helicoverpa armigera, European corn borer Ostrinia nubilalis and others) bore into stems and buds from mid-summer, and their damage opens the way for Botrytis. Check inside dense colas on every visit from August and remove affected buds early. Bacillus thuringiensis (Btk) only works on young larvae and breaks down within days in sunlight, so it means a spray at each visit during moth flight. Spinosad lasts longer but is toxic to bees. Keep both off flowers late in flowering.
  • Spider mites (Tetranychus urticae) explode in hot, dry weather, especially on drought-stressed plants. Fine stippling and webbing on leaf undersides are the early signs. Predatory mites are unreliable outdoors. Prevention is adequate water, mulch, and neem or soap sprays early in vegetative growth.
  • Aphids attract ladybird larvae and lacewings, and hedges or flowering strips (yarrow, dill, fennel) help a little. Companion planting has weak empirical support, so treat it as a modest aid and not as defence.
  • Bud rot (Botrytis cinerea) and powdery mildew do the most damage in a wet autumn. Pick open-structured cultivars, avoid crowding, remove a few large fan leaves and lower branches for airflow, and harvest before a long wet spell instead of after it.
  • Slugs are best handled with iron phosphate pellets. Avoid metaldehyde, which poisons wildlife and dogs.

Every treatment costs a visit, so spend your interventions early. A single spray in early vegetative growth protects for weeks, while a rescue spray in late flower is a poor bet.

5. Harvest and transport

When to cut. Rot risk sets the window more than ripeness does. In mild, wet weather (roughly 10–25°C with high humidity) Botrytis can take hold in dense flowers within a couple of days. A slightly early harvest is nearly always better than a late one, because you give up a small margin of potency but not the crop. In the final two weeks, watch the forecast more than the trichomes.

Ripeness. Use a 30–60× loupe on the calyx trichomes, not the sugar leaves, which amber early. Most growers cut when the heads are mostly cloudy with roughly 5–20% amber. More amber gives a heavier, more sedative effect and, beyond a point, degradation. One common claim needs correcting: amber trichomes do not mean THC is turning into CBD. THC oxidises into CBN, while CBD is a separate product of the same biosynthetic pathway and not a THC derivative. Guides that recommend 30–40% amber describe a late harvest, which is a poor choice when rain is coming. Pistils that are 70–90% brown are a rough secondary indicator.

Staggering. Cut the most exposed site first.

Cutting. Once prepared, 20–30 minutes per site is realistic.

  • Bring bypass secateurs and a folding pruning saw, which is quiet, and nitrile gloves. Resin on hands and clothes is the strongest carrier of odour.
  • Take branches cut to 30–40 cm rather than whole plants. A large plant can weigh several kilograms fresh and is awkward to move.
  • Strip the large fan leaves at the cut. They carry little resin but make up a large share of the fresh weight and volume.
  • Do no wet trimming on site.
  • Cut stems low. Scatter leaf and stem debris under brush away from the patch, and refill and litter the pocket so it doesn't look like a dug hole.
  • Plan trips by fresh weight. Fresh flower dries to roughly a quarter or a fifth of its weight, so 8 kg fresh becomes about 2 kg dry.

Transport. Heat, compression and time are the enemies. Fresh-cut material keeps respiring. Sealed tight in a hot car, it warms, sweats and can start to mold within hours. Odour pulls the other way, since terpenes escape through anything permeable. The compromise:

  • Pack loosely. Never vacuum-seal fresh material, because it crushes trichomes and creates an anaerobic environment.
  • Use an inner barrier bag (nylon, EVOH or metallised film), an outer bag, and a rigid gasketed container such as a screw-lid bucket or hard cooler.
  • Keep it cold, with ice packs at the bottom of an insulated bag and not touching the flowers.
  • Get it to your drying space within two to three hours, and never leave it in a boot in the sun.
  • Polyethylene slowly passes terpenes and barrier films hold them much better, but no bag is odour-proof for long. Short time, low temperature and clean hands do most of the work.
  • Bag the gloves and outer layer at the site, and change before getting into the car.

At the destination. Hang or rack the branches in the dark at about 18–20°C and 55–60% relative humidity, with gentle air movement and no fan blowing directly on them. Leave them 7–12 days, until small stems snap instead of bending. This stage is where odour peaks, so exhaust the room through an activated carbon filter.

What to expect. A lightly tended photoperiod plant in the ground can plausibly give somewhere between 50 and 250 g dry, and autoflowers considerably less. The difference between the low and high end depends less on genetics than on how many plants are still alive and healthy in October. Plan for losses at every stage, and for the one site you will not be able to return to.

Timing Your Outdoor Grow by Season

Beginner 6 min read

Spring Planting

Spring is the ideal time to plant outdoor cannabis. Plants benefit from the increasing photoperiod as days get longer.

Timeline by Region

  • Northern Hemisphere 40┬░N: April-May planting
  • Northern Hemisphere 35┬░N: March-April planting
  • Southern Hemisphere: September-October planting

Frost Protection

Late spring frosts can kill young plants. Use row covers or wait until frost risk has passed.